Reviving the Iconic Hatch: Back Glass Replacement for the MINI Cooper / S 2002-2006 (R50/R53)
The first-generation BMW-engineered MINI Cooper (R50) and its supercharged sibling, the MINI Cooper S (R53), reignited the world's love affair with the nimble, go-kart-like hatchback between 2002 and 2006. With its steeply raked rear profile and instantly recognizable clamshell hatch, this British icon demands respect on the road. However, when that iconic rear window shatters due to flying highway debris, an attempted break-in, or severe thermal shock, your pristine hot hatch instantly becomes a hazardous, drafty, and vulnerable shell. Because the rear window on the R50 and R53 models is made of tempered safety glass, it doesn't just crack—it explodes into thousands of tiny, sharp cubes that infiltrate every crevice of your vehicle's interior.
As a Master Technician at AlexWindshield, I have spent years perfecting the art of auto glass restoration. Replacing the back glass on a first-generation New MINI is an intricate process that requires much more than simply gluing on a new piece of glass. It demands meticulous cleanup, precision alignment, and an understanding of the vehicle's unique tailgate mechanics. We don't just replace your glass; we restore your MINI's safety, security, and aesthetic appeal to factory standards.
Premium Mobile Auto Glass Service Across the Greater Toronto Area (GTA)
Driving a MINI Cooper with a shattered rear window is not just illegal; it is highly dangerous. Exhaust fumes can be sucked into the cabin through the rear opening, and flying glass shards pose a severe risk to your passengers. That is why AlexWindshield brings our state-of-the-art mobile auto glass shop directly to your driveway, workplace, or garage.
Dedicated to Vaughan, Richmond Hill, and Markham
Whether you are parked outside a cafe in Vaughan, at your office in the tech hubs of Markham, or securely in your home garage in Richmond Hill, our fully equipped mobile service vehicles arrive on-site with everything needed to complete a master-level installation. We understand the harsh driving conditions of the Greater Toronto Area (GTA). From freezing winter temperatures that test the limits of glass adhesives to the gravel-heavy construction zones along the 401 and 407, your auto glass takes a beating. We ensure that our GTA clients receive prompt, weather-resilient, and impeccably clean back glass replacements without the hassle of towing their vehicle to a traditional brick-and-mortar shop.
The Technical Blueprint: A Master Technician's Step-by-Step R50/R53 Back Glass Replacement Process
Replacing the hatch glass on a 2002-2006 MINI Cooper is a highly specialized task. The rear glass houses the vital rear defroster grids and accommodates the rear wiper assembly. Below is our rigorous, A-to-Z technical process that ensures a flawless, leak-proof installation every single time.
Phase 1: Pre-Inspection and Ultimate Interior Protection
- Safety Gear & Assessment: The technician begins by donning heavy-duty cut-resistant Kevlar gloves and safety glasses. We inspect the perimeter of the hatch for any existing paint damage or structural warping.
- Cabin Protection: We lay down thick, protective drop cloths over the rear seats, the cargo area, and the exterior bumper. This ensures that no stray adhesive or glass shards scratch your MINI's paint or damage its signature upholstery.
Phase 2: Meticulous Shard Extraction and Hatch Panel Removal
Unlike a laminated front windshield that stays in one piece when broken, the tempered back glass of a MINI Cooper shatters completely. This is the most labor-intensive and critical step of a rear glass replacement.
- Initial Surface Vacuuming: We use an industrial-grade HEPA vacuum to remove all the loose glass cubes resting on the rear parcel shelf, the cargo floor, and the bumper.
- Tailgate Interior Panel Removal: When the back glass shatters, hundreds of pieces fall directly downward, funneling into the hollow cavity of the rear hatch door. If left uncleaned, these shards will rattle maddeningly every time you close the hatch or hit a bump. We carefully unclip and remove the interior plastic trim panels of the tailgate.
- Deep Cavity Extraction: Using specialized flexible crevice attachments, we vacuum completely inside the metal door shell, around the hatch latch mechanism, and deep into the drain holes until every single shard of broken glass is removed from your vehicle.
Phase 3: Hardware Dismantling (Wiper & Defroster Systems)
- Rear Wiper Assembly: The R50/R53 features a rear wiper arm that sits directly adjacent to, or passes through, the glass area. We carefully remove the 13mm retaining nut, use a specialized puller tool to safely detach the wiper arm from its splined shaft, and secure the motor housing.
- Defroster Disconnection: We locate the electrical terminals for the heated rear window. The wiring harness clips are gently detached from the old, broken spade connectors attached to the remaining glass fragments on the frame.
Phase 4: Urethane Cutting and Frame Preparation
- Cutting the Old Bead: The perimeter of the back glass is bonded to the hatch with heavy-duty polyurethane. We use a professional cold knife or a specialized wire-cutting system to slice through the old adhesive bead from the outside in, avoiding any contact with the painted pinch weld.
- Pinch Weld Trimming: Once the remaining perimeter ring of broken glass is lifted away, we use a razor-sharp scraper to trim the old urethane down to a thin, even 1-2mm base. This "fresh" base layer is essential, as new urethane bonds best to a clean layer of old urethane.
- Contaminant Cleaning: The entire frame is thoroughly degreased and cleaned with an alcohol-based, lint-free solution to remove dirt, road salt, and moisture.
Phase 5: Primer Application and High-Quality Adhesive
- Anti-Corrosion Primer: Any microscopic scratches made to the bare metal of the pinch weld during the cutting process are treated with a specialized automotive glass primer. This acts as a rust inhibitor—a crucial step for GTA drivers exposed to heavy winter road salting.
- Glass Preparation: The new replacement glass is cleaned flawlessly. We apply a glass prep/primer to the black ceramic frit band on the inside edge of the new glass to promote chemical adhesion.
- Extruding the Urethane: We load our power caulking gun with premium, OEM-quality fast-curing polyurethane adhesive. A perfect, triangular V-notch bead is extruded along the entire perimeter of the pinch weld. The height and consistency of this bead are vital to prevent wind noise and water leaks.
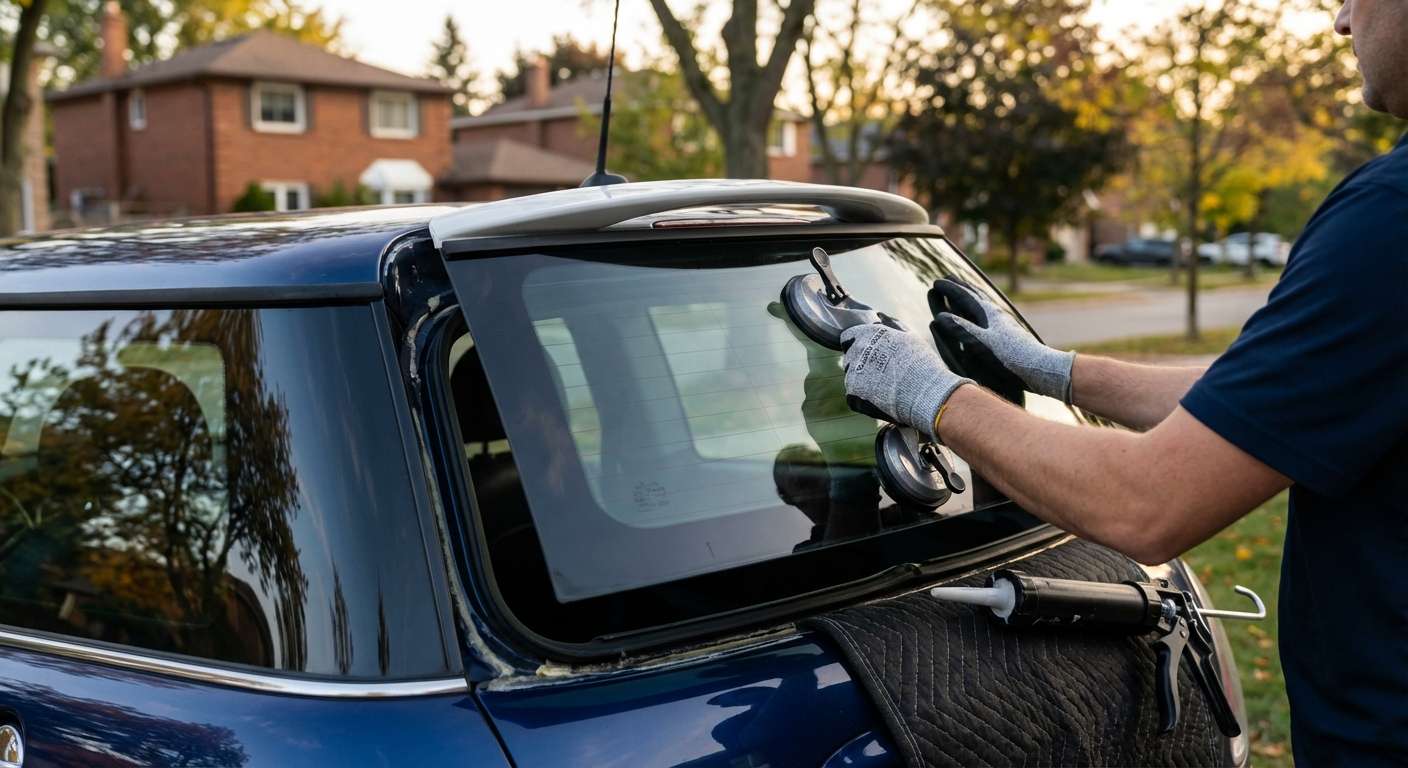
Phase 6: Precision Installation of the New Back Glass
- Setting the Glass: Using heavy-duty suction cup grips, the technician carefully lifts the new back glass. With steady hands and precise alignment, the glass is laid gently onto the fresh urethane bead.
- Compression and Alignment: We press the glass evenly into the frame to ensure it sits flush with the MINI's bodylines. Retention tape is temporarily applied to the top edge to prevent the glass from slipping downwards while the urethane undergoes its initial chemical cross-linking and curing phase.
Phase 7: Reassembly and Final Clean-Up
- System Reconnection: The rear defroster wires are securely plugged into the new terminal tabs on the fresh glass. The electrical circuit is tested to ensure your defrosting capabilities are fully operational for harsh Canadian winters.
- Hardware Reinstallation: The hatch door panels are clipped back into place, ensuring a tight, rattle-free fit. The rear wiper motor and wiper arm are re-aligned to their factory resting positions and bolted down securely.
- Final Polish and Inspection: The new glass is treated with an ammonia-free glass cleaner and polished to a brilliant, streak-free shine. We perform one final visual sweep and secondary vacuum of the cargo area to guarantee that your vehicle is returned to you in pristine condition.
Why Compromise? The Importance of OEM-Quality Glass for Your MINI
The MINI Cooper R50/R53 features a very specific curvature on its rear hatch. Attempting to install cheap, sub-par aftermarket glass can lead to distorted rear visibility, poor wiper contact, and failing defroster grids. At AlexWindshield, we source only the highest quality glass from industry-leading manufacturers that meet or exceed Original Equipment Manufacturer (OEM) specifications. Our replacement glass guarantees exact dimensions, perfect tint matching, and highly conductive, durable defroster lines.
Trust the GTA's Auto Glass Experts: The AlexWindshield Guarantee
A shattered back window doesn't have to ruin your week. At AlexWindshield, we pride ourselves on delivering a seamless, stress-free automotive glass repair experience right to your doorstep. We know that your 2002-2006 MINI Cooper is more than just a car; it's a driver-focused machine with a rich heritage. Our Master Technicians treat your vehicle with the uncompromising care and precision it deserves.
By choosing us, you are partnering with the most trusted mobile auto glass service in the Greater Toronto Area. Whether you reside in the bustling neighborhoods of Vaughan, the quiet suburban streets of Richmond Hill, or the vibrant communities of Markham, we are just a phone call away.
Best of all, every single back glass installation we perform is backed by the comprehensive AlexWindshield Lifetime Warranty. We guarantee our workmanship against any water leaks, wind noises, or stress cracks for as long as you own your MINI. Don't let broken glass keep your iconic hatchback off the road. Contact AlexWindshield today to book your mobile replacement, and experience the ultimate standard in auto glass craftsmanship.


