The "Small Glass, Big Headache" Paradox: Mitsubishi Mirage Vent Glass Breakage
It is a frustrating and incredibly common misconception among urban vehicle thieves that shattering the smallest piece of glass on a car will be the easiest and least disruptive method to gain entry to the cabin. Unfortunately for owners of the highly popular and ultra-efficient Mitsubishi Mirage 2014-2024, this misguided logic means the vent glass is frequently targeted in smash-and-grab incidents. Ironically, these small, triangular, or irregularly shaped pieces of stationary glass—often located near the rear door pillar or front mirror—can be more complex to replace than standard roll-down windows. Because the vent glass is often encapsulated and securely bonded into the vehicle's framework, replacing it requires specialized tools, chemical adhesives, and the steady hand of a Master Technician.
If you have discovered your Mitsubishi Mirage compromised by a shattered vent glass, you are likely dealing with exposed interior elements, compromised vehicle security, and thousands of sharp tempered glass fragments scattered throughout your cabin. Whether you commute daily or use your Mirage for quick city errands, driving with a missing vent window exposes you to severe wind noise, water leaks, and structural vulnerabilities. Restoring your vehicle to its factory-original condition demands strict adherence to automotive glass safety standards, specialized polyurethane curing times, and meticulous interior cleanup.
Understanding the 2014-2024 Mitsubishi Mirage Vent Glass Assembly
The Mitsubishi Mirage 2014-2024 is celebrated for its compact maneuverability and outstanding fuel economy, making it a staple on Canadian roads. Despite its compact footprint, the engineering behind its auto glass requires exacting precision. The vent glass on these models is not simply held in by rubber gaskets; it is a critical, stationary component of the vehicle's greenhouse. Depending on the exact placement (front door quarter/vent or rear door vent), this glass is often bonded directly to the door frame utilizing high-strength automotive urethane or bolted securely behind complex interior trim and weatherstripping.
Improper installation of this specific glass can lead to a host of driving irritations. Even a millimeter of misalignment or a microscopic gap in the urethane bead will result in a highly noticeable, high-pitched wind whistle at highway speeds, not to mention the high probability of moisture intrusion during heavy rainstorms. This is why attempting a DIY replacement or trusting an uncertified shop can result in long-term damage to your Mirage's interior door electronics and upholstery.
Master Technician's A-Z Vent Glass Replacement Process
As a senior Master Technician, I adhere to a rigorous, multi-point protocol when replacing the vent glass on your Mitsubishi Mirage. Our strictly controlled process ensures that the structural integrity of the door frame is maintained, and your interior is completely freed from hazardous glass debris.
Step 1: Vehicle Preparation and Interior Protection
The very first step before any mechanical work begins is safeguarding the interior of your Mitsubishi Mirage. We meticulously drape heavy-duty protective drop cloths over the front and rear seats, the center console, and the exterior paint surrounding the door frame. Specialized automotive tape is applied to the door's clear coat to prevent any accidental tool scratches during the extraction of the old glass frame.
Step 2: Interior Door Panel Removal
Because the vent glass integrates deeply into the door's architecture, we must access the internal mounting points and the window regulator track. We carefully remove the interior door panel using non-marring nylon pry tools. By systematically disengaging the hidden plastic retaining clips, disconnecting the power window and lock switches, and peeling back the moisture vapor barrier, we expose the inner skeleton of the door. This step is completely non-negotiable for a professional vent glass replacement.
Step 3: Thorough Glass Remediation and Interior Vacuuming
When tempered vent glass shatters, it explodes into thousands of pebble-like shards. These shards do not just land on your seats; they cascade down into the cavernous hollows of the door shell. Leaving this glass inside will cause a persistent, maddening rattle every time you close the door or drive over a bump. We utilize high-powered, industrial HEPA vacuums with specialized flexible crevice nozzles to extract every single shard of broken glass from the deep recesses of the door cavity, the window run channels, the seat tracks, and the vehicle's carpeting. Your interior is left immaculately clean.
Step 4: Removal of the Old Glass Frame and Residual Urethane
With the inner door exposed and the glass shards removed, we proceed to detach the structural track that divides the vent glass from the main roll-down window. Any remaining fragments of the shattered vent glass still glued into the pinch weld or mounting bracket are carefully cut out. Using specialized cold knives and powered extractor tools, we trim down the old, hardened factory polyurethane adhesive down to a thin, uniform base layer of 1 to 2 millimeters. This meticulous surface cleaning ensures an ideal bonding substrate for the new adhesive.
Step 5: Primer Application for Unbeatable Adhesion
Surface preparation is the chemical foundation of a safe auto glass installation. Any microscopic scratches on the painted metal frame caused during the urethane removal process are immediately treated with a premium, fast-curing automotive glass primer. We also apply a specialized glass prep cleaner and a glass-specific primer (frit primer) to the bonding edge of the brand new Mitsubishi Mirage vent glass. This two-part primer system prevents future rust formation on the door frame and promotes an unbreakable chemical cross-link between the glass, the urethane, and the vehicle.
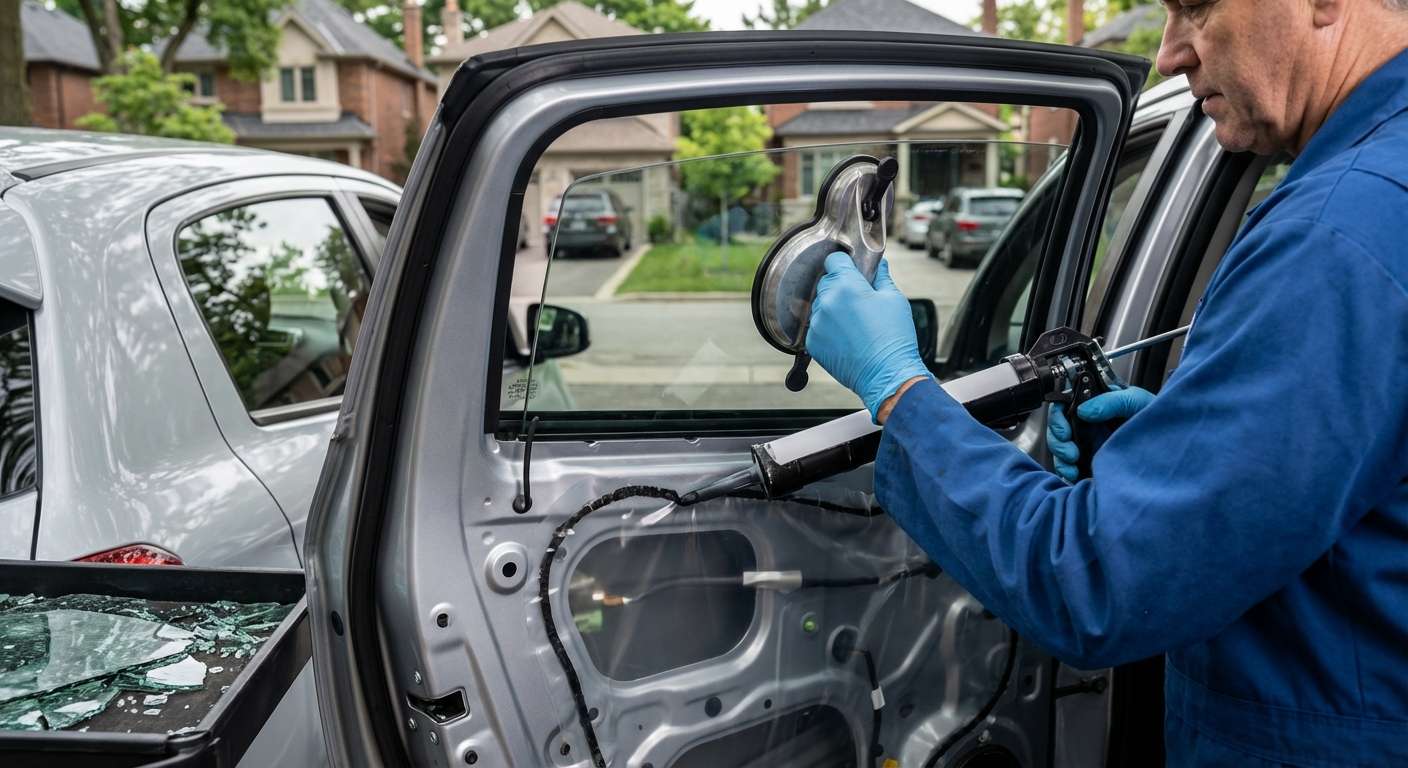
Step 6: High-Quality Adhesive Application and Glass Installation
Once the primer has flashed off and cured, we load our heated pneumatic caulking gun with an advanced, OEM-grade, rapid-curing polyurethane adhesive. We apply a geometrically perfect triangular bead of adhesive directly onto the prepared pinch weld or the glass encapsulation rim. The new vent glass is then precisely maneuvered into position. Using suction cups and alignment markers, the glass is pressed firmly into the wet urethane. We ensure uniform depth and perfect alignment with the exterior door contours to guarantee a flush, aerodynamic fit.
Step 7: Reassembly, Curing, and Final Quality Control
While the high-quality adhesive begins its rapid curing process, we systematically reassemble the door. The dividing window track is bolted back into factory-spec torque, the vapor barrier is resealed, and the interior door panel is carefully snapped back into place. All electrical connectors for the windows and locks are reattached and tested. Finally, we perform a comprehensive visual inspection, clean the newly installed vent glass with an ammonia-free foaming cleaner, and check for any micro-gaps. You are informed of the Safe Drive-Away Time (SDAT) to ensure the urethane has fully solidified before the vehicle is subjected to driving stresses.
Premium Local SEO: Mobile Auto Glass Service Across the GTA
Dealing with a shattered vent glass is a sudden and disruptive emergency. You should not have to drive a compromised, drafty vehicle across the city to wait in a crowded repair shop. That is why our premium mobile auto glass replacement fleet operates extensively throughout the Greater Toronto Area (GTA). We bring the expertise, the glass, and the high-tech tools directly to your driveway or workplace.
- Vaughan: Whether you are parked near Vaughan Mills or commuting from Woodbridge, our mobile units dispatch quickly to secure your vehicle.
- Richmond Hill: If you suffer a break-in overnight in Richmond Hill, our master technicians provide on-site, same-day service so you can get back to your routine without delay.
- Markham: From the thriving tech hubs to residential driveways in Markham, we arrive fully equipped to execute the rigorous A-Z replacement process on your Mitsubishi Mirage on the spot.
Our commitment to local GTA drivers means you never have to compromise your schedule or your safety. We understand the specific weather challenges of the region, utilizing temperature-adaptive urethanes that cure safely in both humid Ontario summers and freezing winter temperatures.
Trust AlexWindshield: Lifetime Warranty and Unmatched Expertise
When it comes to the safety and security of your Mitsubishi Mirage 2014-2024, do not settle for corner-cutting repair tactics. At AlexWindshield, we pride ourselves on delivering dealership-level precision with the unmatched convenience of mobile service. Our senior technicians treat every vehicle as if it were their own, refusing to skip critical steps like interior vacuuming, door panel removal, or proper primer application.
We stand firmly behind the quality of our materials and our craftsmanship. That is why every vent glass replacement performed by AlexWindshield is backed by our comprehensive Lifetime Warranty, covering any highly unlikely instances of wind noise, water leaks, or manufacturer glass defects for as long as you own your vehicle. If you are dealing with broken auto glass in the GTA, contact AlexWindshield today. Experience the ultimate in mobile auto glass perfection, and let us restore your peace of mind on the road.