Restoring the Bulldog Stance: Expert Back Glass Replacement for Your MINI Cooper / S 2007-2013 (R56)
The MINI Cooper and Cooper S (R56 generation, 2007-2013) is a modern automotive classic, celebrated globally for its go-kart handling, compact footprint, and unmistakable "bulldog" stance. A defining aesthetic and functional feature of this iconic silhouette is its uniquely shaped, near-vertical rear windshield. While this upright back glass provides excellent rearward visibility and maximizes the interior cargo space of the hatchback, its flat positioning makes it exceptionally vulnerable to rear-end impacts, flying road debris, and severe temperature fluctuations. When the tempered back glass of your R56 shatters, it does not just form a simple crack—it literally explodes into thousands of tiny, sharp shards that infiltrate every crevice of your compact cargo area and the intricate hatch latching mechanism. Restoring the safety, security, and aesthetics of your beloved MINI requires the precision, patience, and technical expertise of a Master Technician.
Premier Mobile Auto Glass Services Across the Greater Toronto Area (GTA)
Driving with a shattered rear window is completely out of the question, especially when navigating the unpredictable and often harsh Canadian weather. That is exactly why AlexWindshield brings our top-tier auto glass solutions directly to your driveway, office parking lot, or home garage. We specialize in providing comprehensive, mobile auto glass repair and replacement services throughout the Greater Toronto Area (GTA).
Whether you are navigating the busy industrial sectors of Vaughan, commuting through the residential neighborhoods of Richmond Hill, or parked at a bustling shopping center in Markham, our fully equipped mobile service units are dispatched to your exact location. We understand that a shattered back glass creates an immediate security vulnerability and weatherproofing crisis for your MINI Cooper. Our localized GTA mobile service ensures rapid, reliable response times, minimizing your downtime and protecting your premium vehicle's interior from rain, snow, and the risk of unauthorized access.
The AlexWindshield Master Technician Process: Step-by-Step Back Glass Replacement
Replacing the rear glass on an R56 MINI Cooper is a meticulously technical procedure that leaves no room for error. Unlike front windshields, which are manufactured using laminated safety glass designed to hold together upon impact, the rear glass is made of tempered glass. When compromised, it shatters completely to prevent large, lethal shards from injuring passengers. Here is our comprehensive, A-to-Z process for ensuring a flawless, factory-quality replacement.
Step 1: Vehicle Assessment and Comprehensive Interior Protection
Before a single tool is lifted, we meticulously secure the work area. The R56 has a beautifully designed but compact interior that must be strictly protected from abrasive glass dust and harsh urethane chemicals. We begin the process by laying down heavy-duty, puncture-resistant protective drop cloths over the rear seats, the carpeted cargo floor, and the exterior rear bumper. The rear wiper arm assembly is carefully unbolted and removed from the exterior hatch, and the delicate rear defroster wiring grid is electronically disconnected. We then inspect the entire rear hatch frame for any hidden denting, warping, or structural damage that may have caused the initial glass failure or could impede the new installation.
Step 2: Hatch Panel Removal and Extensive Glass Cleanup
Because tempered back glass breaks into thousands of granular pieces, gravity forces the majority of these shards straight down into the hollow cavity of the rear hatch door. Leaving these hidden shards behind will result in maddening, permanent rattles every time you close the trunk or drive over a pothole in Markham or Vaughan. Worse, stray glass can easily jam the electronic hatch locking mechanism.
As a Master Technician, I systematically unclip and carefully remove the interior plastic trim panels surrounding the rear hatch, ensuring no delicate retaining clips are broken. Once the inner workings of the metal door are fully exposed, we utilize industrial-grade, high-powered shop vacuums equipped with specialized micro-crevice tools. We meticulously extract every single broken glass shard from the vehicle's interior. We vacuum inside the door cavity, the latch assembly, the cargo floor, and deep within the rear seat folds. This exhaustive cleanup step is non-negotiable at AlexWindshield and ensures your MINI Cooper remains perfectly rattle-free and entirely safe for your passengers, groceries, and pets.
Step 3: Removing the Remaining Glass and Old Urethane Bead
With the debris fully cleared, we turn our attention back to the perimeter of the window frame. Stubborn shards of glass typically remain heavily adhered to the old urethane glue bead along the pinch weld. Using specialized auto glass extractors and wearing heavy-duty Kevlar protective gloves, we carefully pull away the remaining jagged pieces. Next, using a razor-sharp cold knife and specialized auto glass power tools, we trim down the old factory polyurethane adhesive. We deliberately do not remove it down to the bare metal; instead, we leave a thin, uniform base layer (approximately 1-2 millimeters thick) of the original urethane. This precise layer acts as an ideal bonding substrate for the new adhesive, ensuring maximum structural integrity and preventing water leaks.
Step 4: Pinch Weld Preparation and Primer Application
A flawless and permanent installation relies entirely on the chemical bond between the new glass, the vehicle's pinch weld, and the urethane. We rigorously clean the exposed pinch weld area using specialized, alcohol-based auto glass cleaners to strip away all dirt, grease, and microscopic contaminants. Any minor scratches on the vehicle's painted pinch weld—whether resulting from the initial breakage or the removal process—are meticulously treated.
We then apply an advanced, fast-drying automotive glass primer to any exposed bare metal. This critical chemical barrier prevents future rust and corrosion from developing under the glass—a mandatory step for vehicles enduring the harsh, salt-heavy winter roads of the Greater Toronto Area. We also apply a specific glass primer to the ceramic frit band (the black border) of the brand-new back glass. This activates the glass surface, ensuring the urethane achieves a permanent, molecular cross-linking bond.
Step 5: Applying High-Quality Automotive Adhesive
Once the primers have flashed and fully cured, we prepare the bonding agent. At AlexWindshield, we utilize only premium, industry-leading, high-modulus polyurethane adhesives. This advanced urethane is loaded into a precisely calibrated electric caulking gun to ensure a perfectly consistent, V-shaped bead is extruded around the entire perimeter of the hatch frame. The height, width, and angle of this urethane bead are calculated with exact precision to match the original factory specifications of the 2007-2013 MINI Cooper. This guarantees an impenetrable, watertight seal and officially restores the structural rigidity of the rear hatch door.
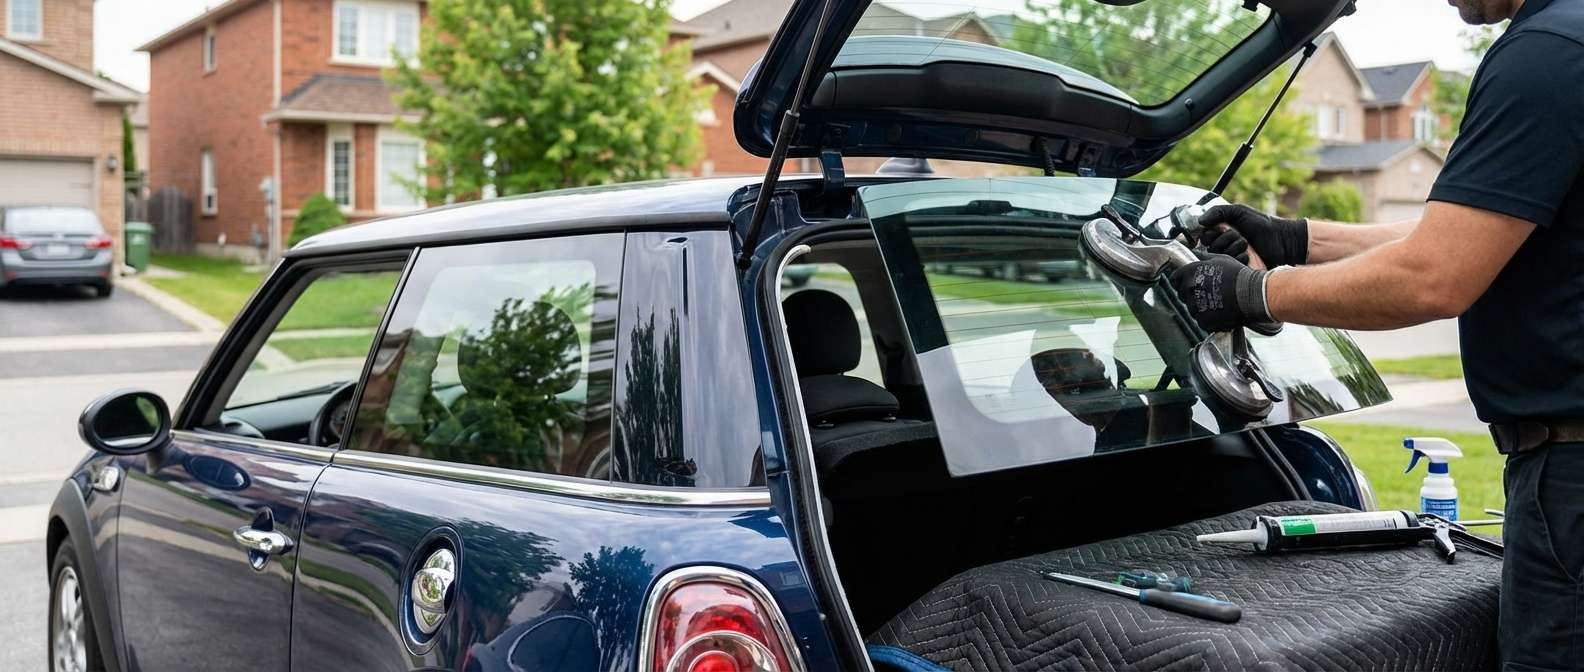
Step 6: Precision Installation of the New Back Glass
Handling the new glass requires a steady hand, immense focus, and precise spatial alignment. The R56 back glass has specific curvature tolerances that must align perfectly with the upper roofline spoiler and the lower tailgate sheet metal. Using heavy-duty, professional-grade suction cup lifters, the new back glass is carefully hoisted and gently set onto the fresh urethane bead. We gently press the glass into place with uniform pressure, ensuring it sits perfectly flush with the exterior body panels. Specialized retention tape is applied temporarily to hold the glass in perfect alignment while the urethane begins its initial curing phase, preventing any microscopic shifting or sagging.
Step 7: Defroster Reconnection, Reassembly, and Final Inspection
With the glass firmly set in its permanent position, we reconnect the rear window defroster grids, ensuring the electrical contacts are secure, tested, and fully functional—an absolutely vital feature for safely defrosting your rear window during freezing, low-visibility mornings in Richmond Hill. The rear wiper motor and wiper arm are carefully reinstalled and torqued to exact factory specifications.
Finally, we snap the interior hatch panels back into place, ensuring all acoustic dampening materials are aligned and all plastic clips engage properly. We perform a final, comprehensive wipe-down of the new glass using streak-free, ammonia-free professional glass cleaners. We conduct a rigorous post-installation inspection, manually checking the panel gaps, the electrical connections, the wiper sweep, and the interior cabin to guarantee zero glass debris or chemical residue remains.
The Importance of Premium Glass and Materials for Your R56
The 2007-2013 MINI Cooper is engineered for spirited, dynamic driving. Because the structural integrity of the vehicle relies heavily on the auto glass, we refuse to cut corners. We source only OEM-equivalent or OEE (Original Equipment Equivalent) back glass for our replacements. Using premium glass offers distinct advantages:
- Perfect Fitment: The glass matches the unique, near-vertical curvature of the R56 chassis exactly, ensuring zero panel gaps or wind noise.
- Thermal Tempering Safety: Ensures the glass meets strict Department of Transportation standards, so it will safely shatter into small granular chunks rather than dangerous jagged shards upon severe impact.
- High-Performance Defroster: Features integrated heating grids that heat up evenly and quickly clear heavy frost and condensation, essential for surviving Canadian winters.
- Factory Aesthetics: Includes the factory-correct dark tinting (if applicable to your specific model trim) to maintain privacy and UV protection.
Strict Safe Drive-Away Time (SDAT) Protocols
One of the most critical aspects of any auto glass replacement is respecting the chemical curing time of the urethane adhesive. We strictly adhere to OEM Safe Drive-Away Time (SDAT) guidelines. The premium fast-curing adhesives we utilize at AlexWindshield allow your vehicle to be safely driven shortly after the installation is complete. Before we hand over the keys, your Master Technician will provide you with specific, easy-to-follow instructions regarding exactly when it is safe to drive, when you can wash your car, and how to manage your windows to ensure internal cabin air pressure does not compromise the fresh, watertight seal of your new back glass.
Trust AlexWindshield: Your GTA Auto Glass Experts
Dealing with a shattered rear window is a highly stressful, messy, and inconvenient experience, but getting it expertly fixed shouldn't be. AlexWindshield is universally recognized as the trusted expert for mobile auto glass services across the entire Greater Toronto Area (GTA). Our unwavering commitment to flawless craftsmanship, our deep technical knowledge of specialized European vehicles like the MINI Cooper, and our genuine dedication to ultimate customer satisfaction sets us completely apart in the auto glass industry.
Whether your R56 hatch glass was unfortunately vandalized in Vaughan, hit by a rogue pebble from a dump truck in Markham, or suffered a sudden stress fracture due to extreme weather in Richmond Hill, our mobile Master Technicians are ready to restore your vehicle to pristine, factory condition. We stand confidently behind our precision work, which is exactly why every single back glass replacement we perform is fully backed by our comprehensive Lifetime Warranty against water leaks, wind noise, and manufacturer glass defects.
Do not let a broken back glass keep your iconic MINI Cooper off the road or expose its interior to the harsh elements. Contact AlexWindshield today for swift, highly professional, and immaculate mobile auto glass replacement. We eliminate the hassle by bringing the premier auto glass shop directly to you, delivering precision engineering, unparalleled convenience, and total peace of mind right to your doorstep.


