The Audi Q3 Aesthetic: Restoring the Integrity of Your Compact Luxury SUV
The second generation Audi Q3 (2019-2027) represents a perfect synthesis of urban agility and premium comfort. Its design relies heavily on the sloping roofline and the integration of the tailgate to convey that sporty, almost coupe-like silhouette. However, when the rear back glass is shattered, that sophisticated image is instantly broken, replaced by the immediate stress of safety concerns, weather exposure, and potential theft. Unlike a front windshield which typically cracks, the rear glass in your Audi Q3 is composed of tempered glass, designed to shatter into thousands of granular chunks upon impact.
At AlexWindshield, we understand that your vehicle is more than just transportation; it is an investment in German engineering. A standard glass shop might treat your Q3 like any other hatchback, but our approach is rooted in the precision required for luxury vehicles. Whether the damage was caused by a break-in attempt, a reversing accident, or road debris, replacing the back glass on a modern Audi requires specific knowledge of the vehicle's electrical defroster systems, rear wiper mechanics, and complex interior trim assembly. This guide details our comprehensive approach to restoring your Audi Q3 to factory specifications.
Why Audi Q3 Rear Glass Replacement is Complex
Replacing the back glass on a 2019-2027 Audi Q3 is significantly more labor-intensive than a standard windshield replacement. This is due to the integration of the glass into the liftgate mechanism and the extensive cleanup required.
1. Tempered Glass Characteristics
The rear windshield is made of tempered safety glass. When compromised, it doesn't hold together; it explodes inward. This creates a massive cleanup hazard, with glass shards finding their way into the liftgate latch, the spare tire well, and even the air conditioning vents under the seats. Ignoring deep cleaning leads to rattling noises and mechanical jams later.
2. Integrated Heating Elements
Your Q3 utilizes a sophisticated rear defroster grid. The connectors for this system are soldered directly onto the glass. Improper handling during installation can snap the vehicle's wiring harness or fail to establish a proper electrical connection, rendering your defroster useless during our freezing Canadian winters.
3. Rear Wiper and Washer Assembly
The Audi Q3 rear glass features a precision-cut hole to accommodate the rear wiper motor shaft. The alignment here must be millimeter-perfect. If the glass is set slightly off-center, the wiper motor will grind against the glass edge, leading to motor failure or immediate glass breakage due to stress fractures.
The AlexWindshield "Master Technician" Protocol: Step-by-Step Replacement
As Master Technicians serving the Greater Toronto Area (GTA), we adhere to a strict technical protocol. We do not skip steps. Below is the detailed A-to-Z process of how we replace the back glass on an Audi Q3 (2019-2027).
Phase 1: Site Preparation and Vehicle Protection
Before any tool touches your car, we ensure the vehicle is protected. Since most back glass damage involves shattered glass, our first priority is containment.
- Exterior Protection: We apply protective tape to the painted metal surfaces of the tailgate and rear quarter panels to prevent scratches during the removal of debris.
- Interior Shielding: We place heavy-duty covers over the rear leather seats and the cargo area to catch falling glass and urethane during the cutting process.
- wiper Removal: We carefully remove the rear wiper arm and the outer nut securing the wiper motor through the glass hole, ensuring the delicate threads are not stripped.
Phase 2: Interior Deconstruction and Panel Removal
This is the most critical step for back glass replacement, differentiating a professional job from a hasty one. To access the wiring and clean the glass properly, we must disassemble the rear hatch.
- Trim Removal: Using non-marring pry tools, we gently remove the upper and side plastic trim panels located on the inside of the liftgate. This exposes the electrical connections and the pinch weld.
- Connector Disconnection: We locate the defroster heating element connectors and the antenna leads (if applicable). We disconnect them carefully, inspecting the vehicle-side plugs for corrosion or damage.
- Motor Access: In many Q3 configurations, we may need to loosen the wiper motor assembly from the inside to ensure the new glass can slide in without obstruction.
Phase 3: The Deep Clean (Glass Shard Extraction)
When tempered glass breaks, it gets everywhere. Leaving glass inside the tailgate panel creates annoying rattles and can jam the trunk lock mechanism.
- Vacuuming the Interior: We use industrial-grade vacuums to remove glass from the carpet, rear seats, and cargo liner.
- Tailgate Cavity Extraction: This is a step many competitors skip. We insert a flexible vacuum hose inside the metal cavity of the rear hatch (through the service holes) to suck out shards that have fallen down near the locking mechanism.
- Spare Tire Well: We lift the cargo floor and remove the spare tire equipment to vacuum any glass that migrated to the lowest point of the trunk.
Phase 4: Removal of Old Adhesive and Glass
Even if the glass is gone, the old adhesive and jagged edges remain bonded to the frame.
- Cutting the Urethane: We use a specialized "Cold Knife" or a wire cutting system to slice through the factory urethane bead. This must be done with extreme precision to avoid scratching the paint on the pinch weld (the metal frame where the glass sits).
- Trimming the Bead: Once the old glass remnants are removed, we trim the existing urethane down to a thin, uniform layer (approximately 1-2mm). This old base serves as the best surface for the new adhesive to bond to.
Phase 5: Surface Preparation and Primer Application
The longevity of the installation depends on chemical bonding.
- Cleaning the Pinch Weld: We clean the frame with a specific bonding activator to remove dirt, grease, and silicone residue.
- Priming Scratches: If any metal was exposed during the removal process, we apply a black body primer. This prevents rust formation. Rust is the enemy of auto glass; if the pinch weld rusts, the glass will eventually leak or detach.
- Glass Preparation: We clean the new OEM-quality back glass with an activator and apply a glass primer to the frit (the black band around the edge of the glass) to ensure the urethane adheres chemically to the glass surface.
Phase 6: Urethane Application and Installation
We use only high-modulus, non-conductive urethane adhesives that meet or exceed Audi's factory standards.
- V-Bead Application: We apply the urethane in a high-profile "V" shape directly onto the glass or the vehicle frame (depending on the specific Q3 sub-model requirements). The V-shape ensures that when the glass is pressed down, the glue spreads outward evenly, eliminating air pockets and potential leaks.
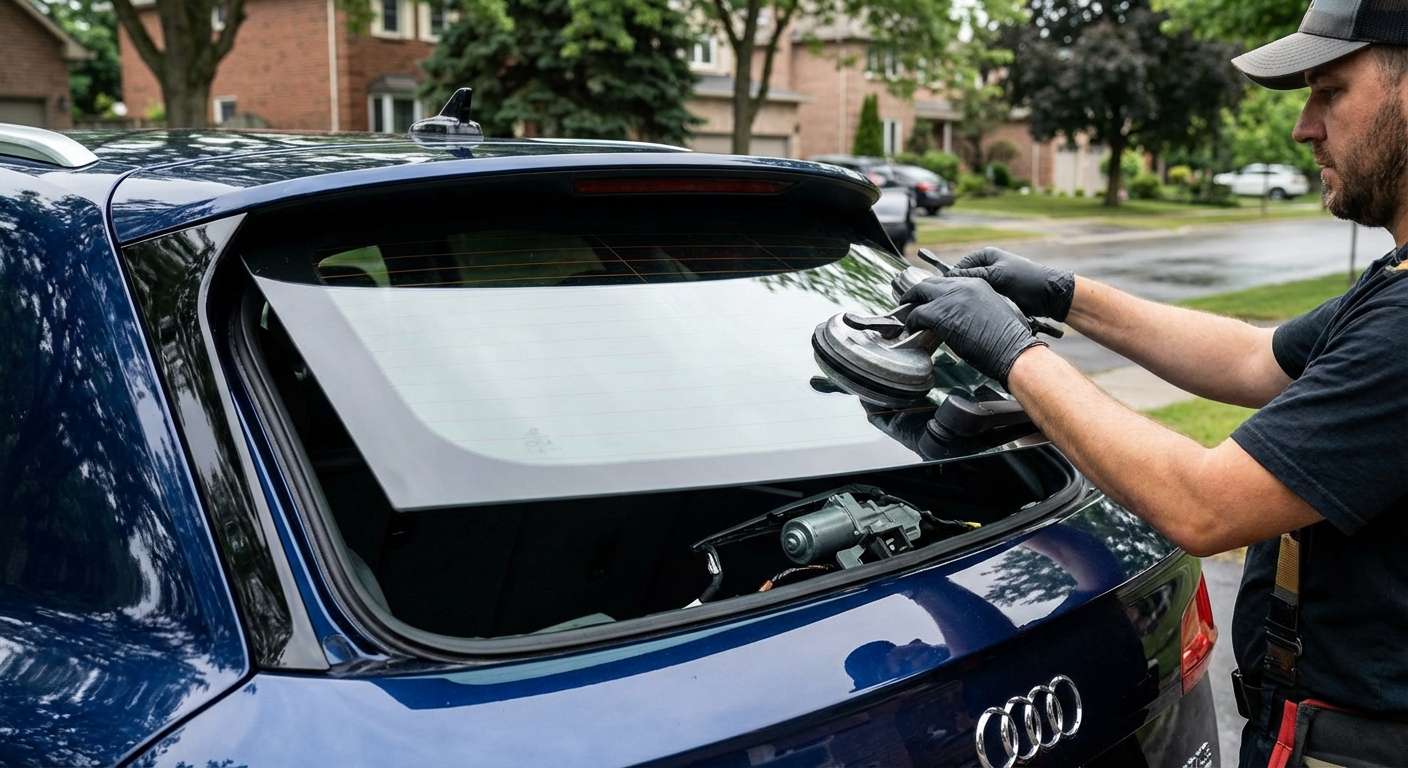
- Setting the Glass: Using heavy-duty suction cups, two technicians (or one technician with a setting arm) carefully lift the glass and place it onto the vehicle. We align the wiper hole perfectly with the motor shaft and ensure the glass is centered between the roof and the tail lights.
- Decking the Glass: We gently press the glass into place to ensure full contact with the adhesive.
Phase 7: Reassembly and Testing
The job isn't done until the car is fully functional.
- Reconnecting Electronics: We reconnect the rear defroster cables and ensure the circuit is complete.
- Wiper Re-installation: The grommet and nut for the rear wiper are tightened to torque specifications, and the wiper arm is reattached.
- Trim Replacement: All interior plastic panels are snapped back into place. We double-check that no clips were broken during removal.
- Final Cleanup: A final vacuum and glass cleaning are performed to ensure your Audi Q3 looks showroom ready.
Serving the Greater Toronto Area: Vaughan, Richmond Hill, and Markham
A shattered back window is an emergency. You cannot leave your vehicle unsecured in a parking lot or driveway, especially given the unpredictable weather in the GTA. This is why AlexWindshield brings the repair shop to you.
Our fully equipped mobile units operate extensively across:
- Vaughan: From the busy streets near Vaughan Mills to the residential driveways in Kleinburg, we offer same-day service to get your Q3 secured immediately.
- Richmond Hill: Whether you are located near Yonge Street or off Bayview, our technicians are local to the area and understand the urgency of rear glass replacement.
- Markham: We service the entire Markham area, ensuring that Unionville and surrounding neighborhoods have access to premium auto glass services without the hassle of driving a damaged vehicle to a shop.
We understand the local geography and traffic patterns, ensuring we arrive within our promised window. Our mobile vans are essentially workshops on wheels, equipped with generators, power tools, and the specific vacuum systems required for the deep cleaning of your Audi.
The Importance of OEM-Quality Glass for Audi
For the Audi Q3 2019-2027, "close enough" is not acceptable. We utilize Original Equipment Equivalent (OEE) or OEM glass. This is vital for several reasons:
- Fit and Curvature: The Q3 rear glass has a complex curvature. Low-quality aftermarket glass often has distortions or does not sit flush against the body, leading to wind noise and water leaks.
- Tint Matching: Most Audi Q3 models come with factory privacy glass (tinted glass) in the rear. We ensure the replacement glass matches the factory darkness level perfectly so it blends seamlessly with your rear side windows.
- Heating Grid Performance: Cheap glass often utilizes inferior conductive materials for the defroster, resulting in slow clearing of ice and fog. Our glass meets factory resistance standards for rapid defrosting.
Why Choose AlexWindshield?
There are many glass shops in Toronto, but few specialize in the meticulous detail required for luxury European SUVs. Choosing AlexWindshield means choosing peace of mind.
The Lifetime Warranty
We stand firmly behind our workmanship. We offer a Lifetime Warranty on our installation for as long as you own your Audi Q3. This covers you against:
- Water leaks.
- Air whistling or wind noise.
- Loose molding or trim.
- Manufacturer defects in the glass distortion.
Master Technicians
Our team is not composed of entry-level installers. Our technicians are Master Certified, having undergone extensive training specifically on late-model European vehicles. We know the difference between a clip you pull and a clip you slide, ensuring your interior panels remain rattle-free.
Conclusion: Restore Your Audi Q3 Today
Driving with a taped-up rear window or shattered glass compromises the safety, security, and beauty of your 2019-2027 Audi Q3. Don't settle for a quick fix that leaves glass shards in your trunk and wind noise in your cabin. Trust the experts who treat your vehicle with the respect it deserves.
AlexWindshield is the premier choice for discerning Audi owners in Vaughan, Richmond Hill, Markham, and the entire GTA. We combine the convenience of mobile service with the technical rigor of a dealership installation.
Ready to schedule your replacement? Contact AlexWindshield today for a free quote and let us get your Audi back on the road in pristine condition.